DMARC monitoring lets you see who is sending email using your domain, whether those messages pass SPF/DKIM authentication, and where problems (like spoofing or misconfiguration) are coming from. In InboxAlly, you can generate a safe “monitoring mode” DMARC record (p=none), publish it in DNS, and then use the DMARC Analytics pane (and Domain Reports for ongoing monitoring) to review compliance trends and drill into failures.
Introduction to DMARC

Domain-based Message Authentication, Reporting, and Conformance (DMARC) is a technical standard that helps protect email senders and recipients from spam, spoofing, and phishing. It gives domain owners control over how receiving mail servers should handle messages that claim to be from their domain.
The primary outcome of implementing DMARC is improved integrity of email communication—plus visibility into authentication issues and unauthorized use.
Understanding DMARC Records
A DMARC policy is published as a TXT record in the DNS records for a domain. This TXT record contains the policy that defines how email receivers handle messages from your domain that do not have valid SPF (Sender Policy Framework) and DKIM (DomainKeys Identified Mail) records.
Setting Up InboxAlly DMARC Monitoring
Step 1: Generate a DMARC Record
To initiate DMARC monitoring, you will need to generate a DMARC TXT record for your domain. InboxAlly simplifies this process through its user-friendly platform.
- Log into your InboxAlly account and navigate to the “DMARC Analytics” pane.
- Select your verified domain from the list presented.
- Click on “Generate DNS Record” to create your default DMARC TXT record.
A record will be produced, resembling:
v=DMARC1; p=none; rua=mailto:xxxx@yyyy.com; sp=none; ri=86400; pct=100; adkim=r; aspf=r
Here is a breakdown of what each tag means:
| Field | Description |
|---|---|
| v=DMARC1 | This indicates the DMARC version in use. |
| p=none | This is the DMARC policy. In this case, none specifies a monitoring mode where no action is taken on non-compliant messages. |
| rua=mailto:xxxx@yyyy.com | This specifies the email address where aggregate reports should be sent. |
| sp=none | This is the subdomain policy, which matches the main domain policy here. |
| ri=86400 | This defines the interval for reports in seconds. Here, it’s set to once every 24 hours. |
| pct=100 | This indicates that the DMARC policy applies to 100% of email messages. |
| adkim=r | This defines the alignment mode for DKIM, which can either be r for relaxed or s for strict. |
| aspf=r | Like adkim, this defines the SPF alignment mode, which can also be r for relaxed or s for strict. |
Step 2: Publish the DMARC Record
Once you have your DMARC record:
- Access the DNS management console for your domain. This is usually where you bought your domain name, such as GoDaddy, Namecheap, or your hosting provider.
- Navigate to the section where you can add new DNS records.
- Create a new TXT record with the following attributes:
- Host/Name:
_dmarc.yourdomain.com(replaceyourdomain.comwith your actual domain name) - Value: Paste the full DMARC TXT record generated by InboxAlly
- Host/Name:
- Save or publish the new record.
Step 3: Start Monitoring
After the DMARC record is published, it could take up to 48 hours to propagate throughout the internet. Once active, ISPs (Internet Service Providers) that support DMARC will begin sending compliance reports to the email address specified in your DMARC record.
InboxAlly will start receiving these DMARC reports and aggregate the data for analysis. For ongoing monitoring of authentication status and domain health, you can also review Domain Reports inside the InboxAlly platform.
Analyzing DMARC Reports with InboxAlly
Understanding the Summary Report
InboxAlly’s dashboard provides you with a comprehensive summary of your email channels’ compliance status.
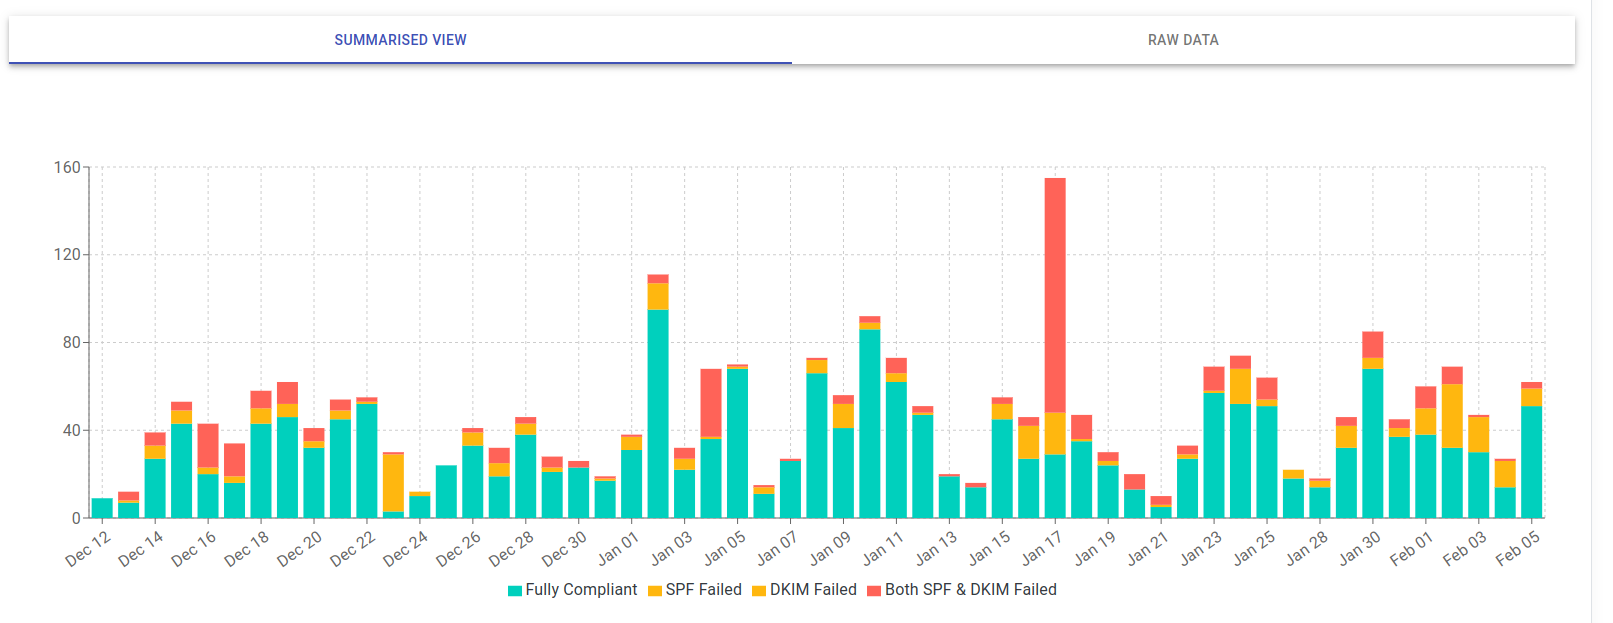
Here’s what you can expect from the summary report:
- Compliant Sends: Shows the daily volume of emails from your domain that passed DMARC (i.e., emails that were properly aligned with both SPF and DKIM).
- SPF / DKIM Non-compliance: Indicates the number or percentage of emails failing SPF and/or DKIM checks, which are important qualifiers for DMARC compliance.
In order to dive deeper into non-compliance issues, you have the ability to inspect the details of individual reports within InboxAlly’s interface.
Interpreting Raw Data Reports
For an in-depth analysis, InboxAlly also provides parsed raw data from the DMARC reports in an easy-to-view format.
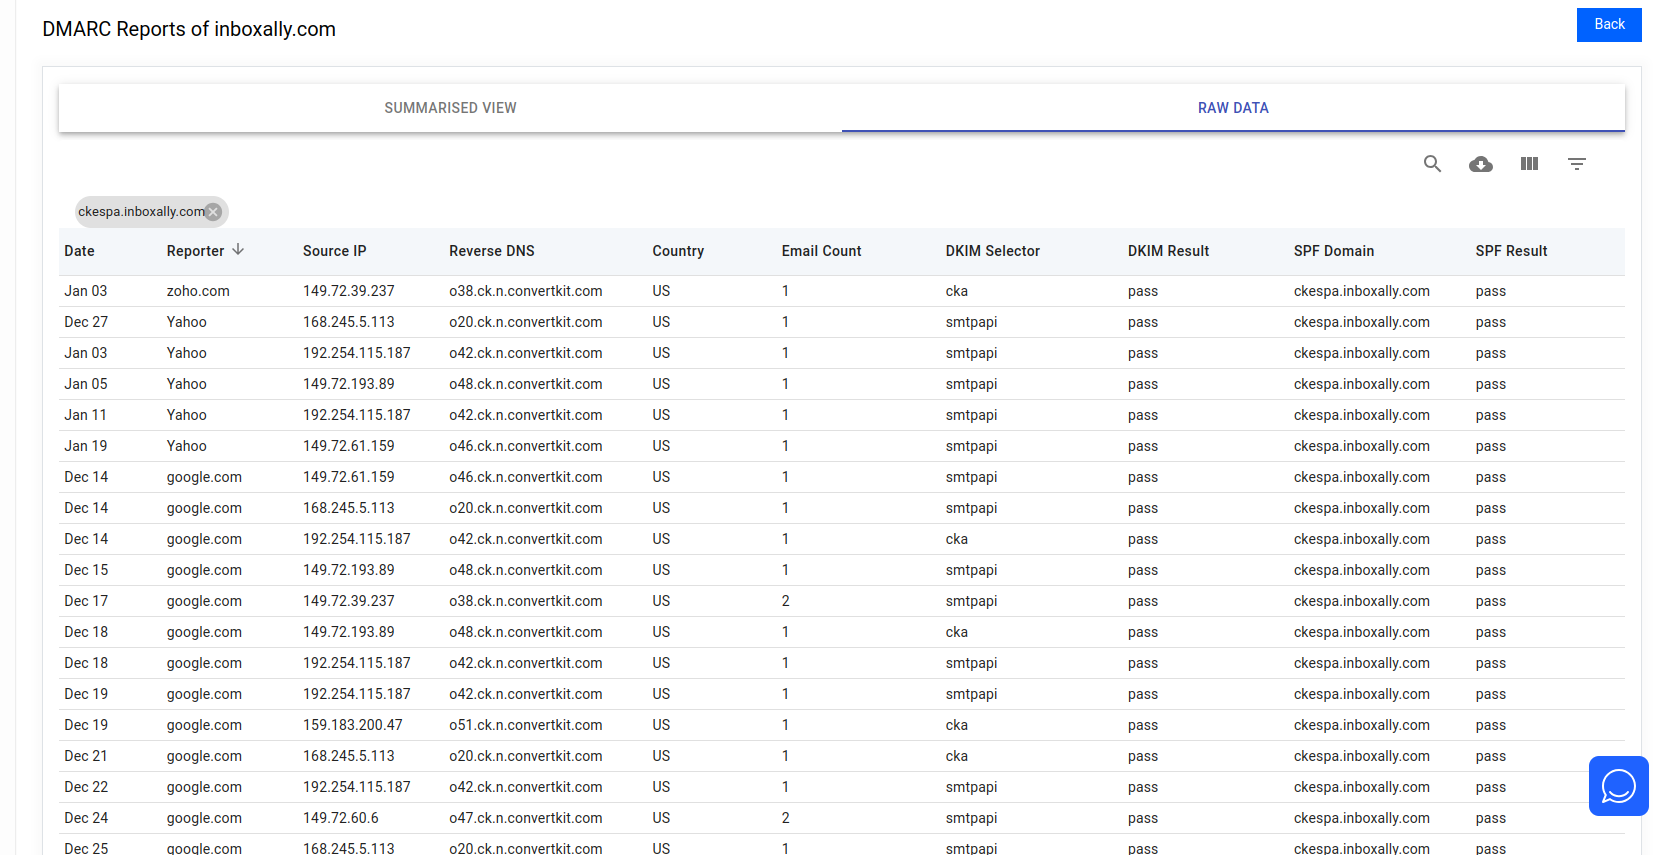
Here’s how to interpret this data:
- Source IP: This field identifies the IP address from which the email was sent. You can use this information to pinpoint the geographical source and potentially identify unauthorized senders.
- Reporter: The ISP who sent the report
- Country: The country of the source IP
- Count: Indicates the number of messages sent from the IP address during the reporting period.
- SPF: Shows whether the SPF check passed or failed.
- DKIM: Similarly, this column shows whether the DKIM check passed or failed.
- Alignment: Reflects whether the message’s From domain aligns with the SPF and DKIM domains. This plays a part in determining the overall DMARC compliance.
The key is to look for any discrepancies or patterns that indicate unauthorized use of your domain. For example, if you see a source IP that you do not recognize, it may be an indication of spoofing or abuse.
Ongoing Management
Implementing and monitoring DMARC with InboxAlly is a crucial step towards securing your email ecosystem. It helps you identify and mitigate issues that could damage your brand’s reputation and the trust of your recipients.
Ongoing management includes:
- Reviewing DMARC reports regularly (in the DMARC Analytics pane and Domain Reports)
- Keeping your SPF/DKIM settings current as sending sources change
- Gradually moving from
nonetoquarantinetorejectto enforce stronger security measures over time (after you’ve confirmed legitimate sources are authenticating correctly)
By understanding and acting on the data provided by InboxAlly, you’re contributing to safer communications and helping uphold the integrity of email as a trusted channel.
Getting more from DMARC monitoring with seed emails
DMARC reports tell you what authenticated (or failed). Seed emails tell you where messages landed (inbox vs. spam). Used together, they help you diagnose deliverability issues faster and validate improvements.
1) Baselining
Before you evaluate real campaign performance, establish a clean baseline:
- Send seed-only campaigns for several days (no customer/prospect list mail).
- Keep variables stable (same From address, same sending source, similar content).
- Use the results as your “known good” reference point for:
- DMARC pass rates (SPF/DKIM alignment)
- Consistent sending sources/IPs
- Inbox vs. spam placement trends
This baseline makes it easier to spot when a new sending source, DNS change, or configuration update introduces authentication failures.
2) Correlating seed placement with DMARC reports
When you see a placement problem, use DMARC data to narrow down the cause:
- If seed emails from a specific ESP consistently land in spam and
- DMARC reports show authentication failures (SPF and/or DKIM misalignment) tied to that same sending source (often visible via Source IP and pass/fail columns)
…you can pinpoint the issue to that sending source’s authentication setup (for example, missing DKIM signing, incorrect SPF include, or misaligned From domain).
Practical workflow:
- Identify the failing placement pattern in your seed results (provider, sender, or stream).
- In DMARC Analytics, filter/drill into the same timeframe.
- Match the placement issue to DMARC failures by Source IP, SPF/DKIM results, and Alignment.
- Fix authentication for that source, then re-test and compare against your baseline.
3) Performance benchmarking
Use seed inbox placement rates over time as a benchmark to measure the impact of changes, such as:
- Updating SPF/DKIM records
- Moving from
p=nonetoquarantine/reject - Adjusting sending patterns or content strategy
Track trends week-over-week (not just day-by-day). When your authentication and sending strategy improve, you should see:
- Higher DMARC compliance (fewer SPF/DKIM failures)
- More consistent inbox placement in seed results
- Fewer unexplained dips tied to specific sources or providers
If you don’t have an InboxAlly account yet, start a free trial to run seed email tests and monitor DMARC results together: Start a free trial of InboxAlly.